
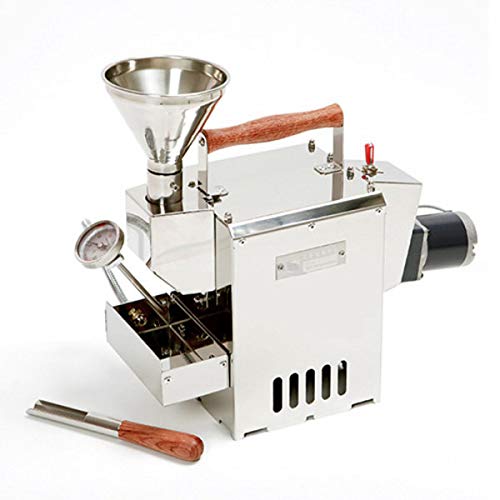

Featured Functions: * Drum -Use 2mm thickness of stainless steel for drum which is the core of roaster, compose with 3mm punching. It reinforces heat storage which over limit of small roster. *Airing -Design for effective circulation and warming of fresh air and hot air, through arranged vent at ton and down, which for smooth airing of inner housing. *Product Description - Heat source: heating method by gas - Rated voltage: DC 12V. 6W - DC power supply: input-AC110~220V, Output-DC 12V 1000Ma - RPM: 60/50:1 reducer - Material: stainless steel / Capacity: 200g, Max.: 250g - Thermometer: 250°C - Stirring drum size: (diameter)120mm x 115mm, thickness: 2mm - Product size: 160(W)x200(D)x300mm(H) - Weight:: 4.1kg Product of Korea
M**E
Great Coffee
I bought the Kaldi when I broke the roasting chamber on my 17 year old Gene Cafe and the was not in stock for repair. I thought about buying coffee until the parts I needed were back in stock, but decided a glorified hair dryer with sensitive electronics in a high heat environment really wasn't what I wanted. So, this review will include a few comparisons between the two. First let me say I love the simplicity of this roaster and total control you have over the roast.1. The Kaldi is nicely finished, and after 8 batches remains so.2. There is some discussion online about lubricating the bearings, but the instructions you receive don't mention that, so I have not done it. You would definitely need to use a high temp lubricant, but I don't know of any food grade lubricants that can stand the heat. So far I haven't found a place to buy replacement bearings when they do wear out, but they look OK for now.3. The chaff collector is silly. It is just a tray that tries to catch the chaff as it comes out of the drum. But, it doesn't catch everything and is pretty messy. Since there is no fan, much more chaff is left in the coffee that the GeneCafe4. The thermometer is on an adjustable arm, but the arm is a little stiff and the thermometer really doesn't stay in the drum, so I end up using a hot pad to hold it in the drum for most of the roast.5. I think the cheaper manual model would make it very cumbersome to turn the drum while dealing with the thermometer and the sampler on the opposite side of the roaster.6. I bought the smaller Kaldi, and you really are limited to 230g. If you put in more green beans than that, when the beans get to first crack, they start coming out of the drum with the chaff.7. The surface of the roaster gets quite hot. I've burned myself once already.8. Since there is no fan, there is no cool down. I used the common approach for home roasters. I sealed up a small box, cut a circle out for a strainer and made a hole for the vacuum that draws air through the coffee. It works well and draws some of the chaff to the bottom, but I find the extra step and lugging around a vacuum a bit inconvenient. That said, you need it to clean up the chaff anyway.9. The Gas Stove I bought (Iwatani) doesn't have very fine control of the flame, but I do get 8 roasts from a canister by Gas One. These canisters have to be shipped by ground so Prime doesn't apply, and in my case it took a week to get here. I am about to try a Coleman canister from a nearby Walmart which holds a bit more gas and is cheaper10. Without a fan the drum does not cool down quickly when the roast is finished, and I worry about weakening the welds on the drum.11. Using Butane gives you total control of the roast, so in my case it finishes around 12 minutes which is far quicker than my GeneCafe, and I think roast has far more flavor and brighter. I preheat to 200, then control the flame so that after dropping in the green beans the chamber heats back to 200 in around 9 minutes. This is where finer control of the flame would help. It is easy for it to roast too quickly. After getting back to 200, it soon enters first crack, and I pull the thermometer out and start sampling until I get the roast I want
R**A
Professional quality roaster with excellent roasting control
5 stars: professional quality roaster with excellent roasting controlPros:1.Well packaged and fully assembled2.Excellent fit & finish with beautifully polished thick gauge stainless steel3.Perforated s/s drum with precision holes4. Copper drum sleeve, optionally removable5.Excellent agitation of coffee beans6.Capacity easily greater than 1/2 lb. of beans7.Also excellent for small batch sample roasts8.Temperature probe sits in rotating bean mass9.Very responsive to temperature adjustments, when desired, by adjusting your gas burner ( more responsive than using a fry pan on a gas burner)10.Roast time can easily be adjusted from 10 to 15 plus minutes depending on burner setting11. Excellent design of passive convection, no need for additional blower fan12.Works very well in home setting on standard gas burner and range hood13.Drum is angled up on open end to prevent spilling of rotating bbeans14.Very easy to hear first and second cracks emanating from drum opening15.Nice probe rod (trier) for sampling beans during roasting16.Roaster requires no maintenance cleaning other than dumping chaff collector & surface17. Very small footprintCons:1.Some drum rotation noise2.Housing gets very hot3. Motor conducts heat from housing and gets slightly hot4.Frame does not sit well on some burner grates and may need support rods5. Included analog thermometer is not responsive enough for precise roasting and should be replaced with a digital thermoprobe6.Positioning the trier next to the thermometer is slightly tight and awkward when sliding into the bean mass7.Positioning the thermometer is also a little tricky as it must be angled into a 11/2 in. drum opening and into the bean mass, while avoiding the drum agitation vanes, and also leaving enough lateral room for the trier to be inserted when desired8.Some chaff falls under nthe drum and into the burner area and requires additional clean up (vacuuming) after roastingMore:For professional control, consider replacing the analog thermometer with a digital probe. I bought the Quest M3 digital thermocouple available from Coffee Shrub. This is plugged into a Mastech K-type digital thermometer from Sweet Marias. The thermocouple mounting needs to allow the tip to enter the bean mass and be narrow enough as to not interfere with trier access into the beans.I took a brass hose barb with a 3/8" barb and 1/2" male pipe thread. I tapped the inside of the barb with a #8 x 1.25 tap. This allowed the Quest probe to screw into the fitting on the tip end, with the cable exiting the threaded end. The threaded end was then screwed into the original thermometer mounting nut. There was a slight pitch difference in the threading but no real problem for this application. The result of all this was a nice narrow profile extension mounting for the probe allowing easy access into the bean mass. Adjusting the probe position just involves bending the adjustable goose neck mounting system. (The goose neck arrives premounted to the chaff collector tray.)Another addition you may need is some frame support if the roaster frame doesn't sit well on your burner grate. My frame fell in a great gap and needed additional support. I used two pieces of "L" shaped aluminum 1"x1"x12" - one under front edge of frame, one under back edge.The actual use of the roaster is simple and as follows:1. Position roaster so drum is centered over gas burner (use support rods if necessary).2. Slide on chaff collector and slip the pre-positioned thermo probe into the drum3. Attach the power supply mini plug4. Flip on the motor switch on the top5. Turn on the digital thermometer6. Turn on gas burner to medium and hood to medium7. In less than 2 minutes and at about 350 degrees, lift off chaff collector, slip on hopper and dump beans into drum8. Remove hopper, replace chaff collector/probe unit9. At about 7 minutes and 380 degrees, reduce heat and ease into first crack10. As first crack slows, increase heat (always use some heat rise to avoid stall)11. If going into second crack, adjust burner heat for the rate you want while testing roast with trier12. When ready to end roast, move quickly and: a. turn burner off b. lift chaff collector off c. grab roaster handle in one hand, motor body in other hand, dumping beans into an external vacuum cooling bowl d. turn motor off e. after beans are cool, turn hood off and vacuum chaff debris over and around burner area.Note: A decent fast roast can be achieved by just leaving the burner on medium or you can customize and develop your roast profiles with burner adjustments. Inherent convection air flow is adequate and needs no adjustment or additional blower fan. All roasts were done with the copper sleeve removed from the drum. All beans roasted in the fully perforated drum have been of excellent and uniform quality.This unit came with a 120V to 12VDC adaptor terminating in a 5.5 mm mini plug.
L**E
Really enjoying the Kaldi roaster.
I am enjoying the roaster. It works well; sturdy construction and the right amount of coffee for our family. It can easily hold 200 grams of beans without any spilling out. I like the fact that I can roast multiple batches pretty quickly without too much set up necessary. Just have the next scoop of beans ready to go and you don't have to turn anything off. I gave Temp Control a four which is not really "fair" to the roaster - I am still learning to adjust and monitor the flame on my camp stove. As for safety features, the three may seem harsh but it's basically a stainless steel box that you are heating up to 300+ degree - gloves are a wise thing to (literally) have on hand. The wooden handle does stay cool but when you pick it up to transfer the beans, the weight of the roaster can make the handle slide and then you are touching hot metal. Get some oven gloves or leather gloves. I'm not tempted to get the larger roaster.....yet!
Trustpilot
1 month ago
3 weeks ago